63 KiB
Nasal 脚本语言
       __                _
    /\ \ \__ _ ___  __ _| |
   /  \/ / _` / __|/ _` | |
  / /\  / (_| \__ \ (_| | |
  \_\ \/ \__,_|___/\__,_|_|


目录
如果有好的意见或建议,欢迎联系我们!
-
E-mail: lhk101lhk101@qq.com
-
QQ: 896693328
简介
Nasal 是一个与ECMAscript标准语法设计相似的编程语言,并且作为运行脚本语言被著名的开源飞行模拟器 FlightGear 所依赖。 该语言的设计者和初版解释器实现者为 Andy Ross。
这个解释器项目则由 ValKmjolnir 完全使用 C++(-std=c++11)重新实现,没有复用 Andy Ross的nasal解释器 中的任何一行代码。尽管没有任何的参考代码,我们依然非常感谢Andy为我们带来了这样一个神奇且容易上手的编程语言。
现在这个项目已经使用 MIT 协议 开源 (2021/5/4)。根据该协议的内容,你们可以根据自己的需求进行修改,使用它来学习或者创造更多有趣的东西(不过可别忘了,如果要开源必须要附带本项目拥有者的相关信息)。
我们为什么想要重新写一个nasal解释器? 这是个很偶然的想法。2019年暑假,FGPRC 的成员告诉我,在Flightgear中提供的nasal控制台窗口中进行调试实在是太费劲了,有时候只是想检查语法错误,也得花费时间打开这个软件等待加载进去之后进行调试。所以我就想,也许可以写一个全新的解释器来帮助他们检查语法错误,甚至是检查运行时的错误。
我编写了nasal的词法分析器和语法分析器,以及一个全新的字节码虚拟机(曾经我们使用ast解释器来直接在抽象语法树中执行,然而在v4.0之后这个解释器已经淘汰),并用这个运行时来进行nasal程序的调试。我们发现使用这个解释器来检测语法和运行时错误非常快捷,远比每次都需要复制nasal代码到Flightgear的nasal控制台中去查看要方便,且错误信息清晰直观。
当然,你也可以使用这个语言来写一些与Flightgear运行环境无关的其他有趣的程序(它毕竟就是个脚本语言),并用这个解释器来执行,让这个语言脱离Flightgear的环境,去别的地方大展身手。你也可以编写你自己的模块,让nasal来调用,使得这个语言成为你的项目中一个非常有用的工具。
编译方式
我们推荐你下载最新更新的代码包来直接编译,这个项目非常小巧因此你可以非常快速地将它编译出来。
注意: 如果你想直接下载发行版提供的zip/tar.gz压缩包来构建这个解释器,在下载之后请阅读下文中对应发行版本的发行日志以保证这个发行版的文件中不包含非常严重的bug(有的严重bug都是在发行之后才发现,非常搞心态)。在发行版日志中我们会告知如何在代码中手动修复这个严重的bug。

Windows用户请一定一定一定要使用MinGW编译!
Windows(MinGW-w64)用户使用g++编译器并使用以下命令来进行编译. 没有编译环境的请在这里下载MinGW-w64。(编译不出来别怪我没说哦👿)
g++ -std=c++11 -O3 main.cpp -o nasal.exe -fno-exceptions -static
linux/macOS/Unix 用户可以使用g++或者clang++替代下面命令中中括号的部分来进行编译。
[cpp compiler] -std=c++11 -O3 main.cpp -o nasal -fno-exceptions -ldl
当然也可以使用makefile,mingw32-make是 Windows(MinGW-w64) 平台的make:
mingw32-make nasal.exe
mingw32-make.exe nasal.exe
linux/macOS/Unix 平台直接使用make即可:
make nasal
使用方法
首先我们要通过教程知道这个语言的语法以及如何使用这个解释器来运行nasal程序。
输入下面的命令来 直接 执行:
./nasal filename
下面两个命令可以用于查看解释器的版本:
./nasal -v
./nasal --version
       __                _
    /\ \ \__ _ ___  __ _| |
   /  \/ / _` / __|/ _` | |
  / /\  / (_| \__ \ (_| | |
  \_\ \/ \__,_|___/\__,_|_|
nasal ver : 10.0
c++ std   : 201103
thanks to : https://github.com/andyross/nasal
code repo : https://github.com/ValKmjolnir/Nasal-Interpreter
code repo : https://gitee.com/valkmjolnir/Nasal-Interpreter
lang info : http://wiki.flightgear.org/Nasal_scripting_language
input <nasal -h> to get help .
下面两个命令可以用于查看帮助(调试器的使用方法可以进入调试模式之后根据提示来查询):
./nasal -h
./nasal --help
     ,--#-,
<3  / \____\  <3
    |_|__A_|
nasal <option>
option:
    -h, --help    | get help.
    -v, --version | get version of nasal interpreter.

nasal <file>
file:
    input file name to execute script file.

nasal [options...] <file>
option:
    -l,   --lex     | view token info.
    -a,   --ast     | view abstract syntax tree.
    -c,   --code    | view bytecode.
    -e,   --exec    | execute.
    -t,   --time    | execute and get the running time.
    -o,   --opcnt   | execute and count used operands.
    -d,   --detail  | execute and get detail crash info.
                    | get garbage collector info if did not crash.
    -op,  --optimize| use optimizer(beta).
                    | if want to use -op and run, please use -op -e/-t/-o/-d.
    -dbg, --debug   | debug mode (this will ignore -t -o -d).
file:
    input file name to execute script file.
如果你的操作系统是 Windows 并且你想输出unicode,请保证你的控制台程序的代码页支持utf-8,若不支持,使用下面这个命令启用代码页:
chcp 65001
或者你可以直接在nasal代码里写这个来开启:
if(os.platform()=="windows")
    system("chcp 65001");
教程
nasal是非常容易上手的,你甚至可以在15分钟之内看完这里的基本教程并且直接开始编写你想要的程序。 如果你先前已经是C/C++,javascript选手,那么这个教程几乎可以不用看了…… 在看完该教程之后,基本上你就完全掌握了这个语言:
基本类型
vm_none 是特殊的错误类型。这个类型用于终止虚拟机的执行,用户是无法申请到这个类型的,该类型只能由字节码虚拟机自己在抛出错误时产生。
vm_nil 是空类型。类似于null。
var spc=nil;
vm_num 有三种形式:十进制,十六进制以及八进制。并且该类型使用IEEE754标准的浮点数double格式来存储。
# this language use '#' to write notes
var n=1;          # dec
var n=2.71828;    # dec
var n=2.147e16;   # dec
var n=1e-10;      # dec
var n=0x7fffffff; # hex
var n=0xAA55;     # hex
var n=0o170001;   # oct
vm_str 也有三种不同的格式。第三种只允许包含一个的字符。
var s='str';
var s="another string";
var s=`c`;

# 该语言也支持一些特别的转义字符:

'\a';
'\b';
'\e';
'\f';
'\n';
'\r';
'\t';
'\v';
'\0';
'\\';
'\?';
'\'';
'\"';
vm_vec 有不受限制的长度并且可以存储所有类型的数据。(当然不能超过可分配内存空间的长度)
var vec=[];
var vec=[
    0,
    nil,
    {},
    [],
    func(){return 0;}
];
append(vec,0,1,2);
vm_hash 使用哈希表(类似于python中的字典),通过键值对来存储数据。key可以是一个字符串,也可以是一个标识符。
var hash={
    member1:nil,
    member2:'str',
    'member3':'member\'s name can also be a string constant',
    "member4":"also this",
    function:func(){
        var a=me.member2~me.member3;
        return a;
    }
};
vm_func 函数类型。(实际上在这个语言里函数也是一种lambda表达式)
var f=func(x,y,z){
    return nil;
}
var f=func{
    return 1024;
}
var f=func(x,y,z,default1=1,default2=2){
    return x+y+z+default1+default2;
}
var f=func(args...){
    var sum=0;
    foreach(var i;args)
        sum+=i;
    return sum;
}
vm_upval 是用于存储闭包数据的特殊类型。这种类型只在nasal_vm中使用,用于确保闭包是可以正确使用的。
vm_obj 是一种用来存储用户自定义数据的特别类型。这意味着你可以在nasal中使用C/C++的一些复杂数据结构。如果你想为nasal添加一种新的数据结构,那么就可以使用这个类型的数据。这种类型的数据一般由内置函数或者库开发者提供的模块函数生成。
var my_new_obj=func(){
    return __builtin_my_obj();
}
var obj=my_new_obj();
运算符
nasal拥有基本的四种数学运算符 + - * /以及一个特别的运算符 ~,这个运算符用于拼接两个字符串。
1+2-1*2/1;
'str1'~'str2';
(1+2)*(3+4)
对于条件语句,可以使用== != < > <= >=来比较两个数据。and or 有着与C/C++中 && ||运算符相同的功能,用于连接两个不同的条件语句。
1+1 and 0;
1<0 or 1>0;
1<=0 and 1>=0;
1==0 or 1!=0;
单目运算符- !与C/C++中的运算符功能类似.
-1;
!0;
赋值运算符= += -= *= /= ~=正如其名,用于进行赋值。
a=b=c=d=1;
a+=1;
a-=1;
a*=1;
a/=1;
a~='string';
定义变量
var a=1;
var (a,b,c)=[0,1,2];
var (a,b,c)=(0,1,2);
(var a,b,c)=[0,1,2];
(var a,b,c)=(0,1,2);
多变量赋值
最后这个语句通常用于交换两个变量的数据,类似于Python中的操作。
(a,b[0],c.d)=[0,1,2];
(a,b[1],c.e)=(0,1,2);
(a,b)=(b,a);
条件语句
nasal在提供else if的同时还有另外一个关键字elsif。该关键字与else if有相同的功能。
if(1){
    ;
}elsif(2){
    ;
}else if(3){
    ;
}else{
    ;
}
循环语句
while循环和for循环大体上与C/C++是一致的。
while(condition)
    continue;

for(var i=0;i<10;i+=1)
    break;
同时,nasal还有另外两种直接遍历列表的循环方式:
forindex 会获取列表的下标,依次递增. 下标会从0递增到size(elem)-1结束。
forindex(var i;elem)
    print(elem[i]);
foreach会依次直接获取列表中的数据. 这些数据会从elem[0]依次获取到elem[size(elem)-1].
foreach(var i;elem)
    print(i);
生成子列表
nasal提供了下面第一句的类似语法来从列表中随机或者按照一个区间获取数据,并且拼接生成一个新的列表。当然如果中括号内只有一个下标的话,你会直接获得这个下标对应的数据而不是一个子列表。如果直接对string使用下标来获取内容的话,会得到对应字符的 ascii值。如果你想进一步获得这个字符串,可以尝试使用内置函数chr()。
a[0];
a[-1,1,0:2,0:,:3,:,nil:8,3:nil,nil:nil];
"hello world"[0];
特殊函数调用语法
这种特别的调用方式有时非常有用,但是切记这种调用方式不是很高效,因为哈希表会使用字符串比对来找到数据存放的位置。
f(x:0,y:nil,z:[]);
lambda表达式
正如上文所述,函数有这样一种直接编写函数体并且直接调用的方式:
func(x,y){return x+y}(0,1);
func(x){return 1/(1+math.exp(-x));}(0.5);
测试文件中有一个非常有趣的文件y-combinator.nas,也就是y组合子,可以试一试,非常有趣:
var fib=func(f){
    return f(f);
}(
    func(f){
        return func(x){
            if(x<2) return x;
            return f(f)(x-1)+f(f)(x-2);
        }
    }
);
闭包
闭包是一种特别的作用域,你可以从这个作用域中获取其保存的所有变量,而这些变量原本不是你当前运行的函数的局部作用域中的。下面这个例子里,结果是1:
var f=func(){
    var a=1;
    return func(){return a;};
}
print(f()());
如果善用闭包,你可以使用它来进行面向对象编程。
var student=func(n,a){
    var (name,age)=(n,a);
    return {
        print_info:func() {println(name,' ',age);},
        set_age:   func(a){age=a;},
        get_age:   func() {return age;},
        set_name:  func(n){name=n;},
        get_name:  func() {return name;}
    };
}
特性
当然,也有另外一种办法来面向对象编程,那就是利用trait。
当一个hash类型中,有一个成员的key是parents,并且该成员是一个数组的话,那么当你试图从这个hash中寻找一个它自己没有的成员名时,虚拟机会进一步搜索parents数组。
如果该数组中有一个hash类型,有一个成员的key与当前你搜索的成员名一致,那么你会得到这个成员对应的值。
使用这个机制,我们可以进行面向对象编程,下面样例的结果是114514:
var trait={
    get:func{return me.val;},
    set:func(x){me.val=x;}
};

var class={
    new:func(){
        return {
            val:nil,
            parents:[trait]
        };
    }
};
var a=class.new();
a.set(114514);
println(a.get());
首先虚拟机会发现在a中找不到成员set,但是在a.parents中有个hash类型trait存在该成员,所以返回了这个成员的值。
成员me指向的是a自身,类似于一些语言中的this,所以我们通过这个函数,实际上修改了a.val。get函数的调用实际上也经过了相同的过程。
不过我们必须提醒你一点,如果你在这个地方使用该优化来减少hash的搜索开销:
var b=a.get;
println(b());
println(b());
那么你会发现虚拟机崩溃了:
114514
114514
[vm] callh: must call a hash
trace back:
        0x0000050f:     3d 00 00 00 08      callh  0x8 ("val") (a.nas:2)
        0x00000544:     3e 00 00 00 00      callfv 0x0 (a.nas:19)
vm stack(0x7fffd1b38250<sp+83>, limit 10, total 7):
  0x00000059    | nil  |
  0x00000058    | pc   | 0x544
  0x00000057    | addr | 0x0
  0x00000056    | nil  |
  0x00000055    | nil  |
  0x00000054    | nil  |
  0x00000053    | func | <0x1a3b250> entry:0x125
因为执行a.get时在trait.get函数的属性中进行了me=a的操作。所以接下来第一次运行的时候它确实成功运行了。但是当函数返回时,me会被自动设置为nil以保证安全,所以第二次调用的时候,me不再是个hash类型,故虚拟机抛出了错误。这不意味着这种优化方法是不可行的,只要你理解了它的运行机制,这种优化方式仍然可以使用。
内置函数
这个部分对于纯粹的使用者来说是不需要了解的,它将告诉你我们是如何为这个解释器添加新的内置函数的。如果你对于添加自己私人订制的内置函数很感兴趣,那么这个部分可能会帮到你,并且……
警告: 如果你 不想 通过直接修改解释器源码来添加你自定义的函数,那么你应该看下一个部分 模块 的内容,而不是这个部分的内容。
如果你确实是想修改源码来搞一个自己私人订制的解释器,那么你可以说:“我他妈就是想自己私人订制,你们他妈的管得着吗”,然后看看源码中关于内置函数的部分,以及lib.nas中是如何包装这些函数的,还有下面的样例:
定义新的内置函数:
nasal_ref builtin_print(nasal_ref*,nasal_gc&);
// 你可以使用这个宏来直接定义一个新的内置函数
nas_native(builtin_print);
然后用C++完成这个函数的函数体:
nasal_ref builtin_print(nasal_ref* local,nasal_gc& gc)
{
    // 局部变量的下标其实是从1开始的
    // 因为local[0]是保留给'me'的空间
    nasal_ref vec=local[1];
    // 主要部分
    // 一些必要的类型检查和输入合法性检测也要在这里写出
    // 如果检测到问题,用builtin_err函数来返回vm_null
    // 并且狠狠地骂那些不好好写代码的混蛋(玩笑)
    for(auto& i:vec.vec().elems)
        switch(i.type)
        {
            case vm_none: std::cout<<"undefined";      break;
            case vm_nil:  std::cout<<"nil";            break;
            case vm_num:  std::cout<<i.num();          break;
            case vm_str:  std::cout<<i.str();          break;
            case vm_vec:  i.vec().print();             break;
            case vm_hash: i.hash().print();            break;
            case vm_func: std::cout<<"func(...){...}"; break;
            case vm_obj:  std::cout<<"<object>";       break;
        }
    std::cout<<std::flush;
    // 最后一定要记得生成返回值,返回值必须是一个内置的类型,
    // 可以使用gc::alloc(type)来申请一个需要内存管理的复杂数据结构
    // 或者用我们已经定义好的nil/one/zero,这些可以直接使用
    return nil;
}
这些工作都完成之后,在内置函数注册表中填写它在nasal中的别名,并且在表中填对这个函数的函数指针:
struct func
{
    const char* name;
    nasal_ref (*func)(nasal_ref*,nasal_gc&);
} builtin[]=
{
    {"__builtin_print",builtin_print},
    {nullptr,          nullptr      }
};
最后,将其包装起来扔到nasal文件中:
var print=func(elems...){
    return __builtin_print(elems);
};
事实上__builtin_print后面跟着的传参列表不是必须要写的。所以这样写也对:
var print=func(elems...){
    return __builtin_print;
};
一定要注意,如果你不把内置函数包装到一个普通的nasal函数中,那么直接调用这个内置函数会在参数传入阶段出现严重的错误,这个错误会导致 segmentation error。也就是大家的老朋友段错误。
在nasal文件中使用import("文件名.nas")可以导入该文件中你包装的所有内置函数,接下来你就可以使用他们了。
v6.5 更新:
在内置函数中使用gc::builtin_alloc来避免在内置函数中多次申请需要内存管理的数据类型时可能出现的垃圾收集器的问题。
当运行内置函数的时候,内存分配器如果运行超过一次,那么会有更大可能性多次触发垃圾收集器的mark-sweep。这个操作会在gc::alloc中触发。
如果先前获取的数值没有被正确存到可以被垃圾收集器索引到的地方,那么它会被错误地回收,这会导致严重的错误。
所以如果不放心,那就在内置函数中用gc::builtin_alloc来申请新的数据。
或者你也可以这样使用gc::alloc来规避错误的垃圾回收,目前我们大多使用这种方式,因为gc::builtin_alloc没那么靠谱:
nasal_ref builtin_keys(nasal_ref* local,nasal_gc& gc)
{
    nasal_ref hash=local[1];
    if(hash.type!=vm_hash)
        return builtin_err("keys","\"hash\" must be hash");
    // 把数组提前push到操作数栈上来避免被收集
    // 但是一定要检查会不会栈溢出
    if(gc.top+1>=gc.canary)
        return builtin_err("keys","expand temporary space error:stackoverflow");
    (++gc.top)[0]=gc.alloc(vm_vec);
    auto& vec=gc.top[0].vec().elems;
    for(auto& iter:hash.hash().elems)
    {
        nasal_ref str=gc.alloc(vm_str);
        str.str()=iter.first;
        vec.push_back(str);
    }
    --gc.top;
    return gc.top[1];
}
模块(开发者教程)
如果只有上文中那种方式来添加你自定义的函数到nasal中,这肯定是非常麻烦的。因此,我们实现了一组实用的内置函数来帮助你添加你自己创建的模块。
在2021/12/3更新后,我们给lib.nas添加了下面的这一批函数:
var dylib=
{
    dlopen:  func(libname){return __builtin_dlopen;},
    dlsym:   func(lib,sym){return __builtin_dlsym; },
    dlclose: func(lib){return __builtin_dlclose;   },
    dlcall:  func(funcptr,args...){return __builtin_dlcall}
};
看名字就大概能猜出来,这些函数就是用来加载动态库的,这样nasal解释器可以根据用户需求灵活加载动态库来执行。让我们看看这些函数该如何使用。
首先,用C++写个项目,并且编译成动态库。我们就拿fib.cpp作为例子来说明(样例代码可以在./module中找到):
// 这个头文件得加上,因为我们需要拿到nasal的api
#include "nasal.h"
double fibonaci(double x){
    if(x<=2)
        return x;
    return fibonaci(x-1)+fibonaci(x-2);
}
// 记得用extern "C"
// 这样找符号会更加快速便捷,不要在意编译时的warning
extern "C" nasal_ref fib(std::vector<nasal_ref>& args,nasal_gc& gc){
    // 传参会被送到一个vm_vec类型中送过来,而不是上文中那种指针直接指向局部作用域
    nasal_ref num=args[0];
    // 如果你想让这个函数有更强的稳定性,那么一定要进行合法性检查
    // builtin_err会输出错误信息并返回错误类型让虚拟机终止执行
    if(num.type!=vm_num)
        return builtin_err("extern_fib","\"num\" must be number");
    // vm_num作为普通的数字类型,不是内存管理的对象,所以无需申请
    // 如果需要返回内存管理的对象,请使用gc.alloc(type)
    return {vm_num,fibonaci(num.to_number())};
}
接着我们把fib.cpp编译成动态库。
Linux(.so):
clang++ -c -O3 fib.cpp -fPIC -o fib.o
clang++ -shared -o libfib.so fib.o
Mac(.so & .dylib): 和Linux下操作相同。
Windows(.dll):
g++ -c -O3 fib.cpp -fPIC -o fib.o
g++ -shared -o libfib.dll fib.o
好了,那么我们可以写一个测试用的nasal代码来运行这个斐波那契函数了。下面例子中os.platform()是用来检测当前运行的系统环境的,这样我们可以对不同系统进行适配:
import("lib.nas");
var dlhandle=dylib.dlopen("./module/libfib."~(os.platform()=="windows"?"dll":"so"));
var fib=dylib.dlsym(dlhandle,"fib");
for(var i=1;i<30;i+=1)
    println(dylib.dlcall(fib,i));
dylib.dlclose(dlhandle);
dylib.dlopen用于加载动态库。
dylib.dlsym通过符号从动态库中获得函数地址。
dylib.dlcall用于调用函数,第一个参数是动态库函数的地址,这是个特殊类型,一定要保证这个参数是vm_obj类型并且type=obj_extern。
dylib.dlclose用于卸载动态库,当然,在这个函数调用之后,所有从该库中获取的函数都作废。
如果接下来你看到了这个运行结果,恭喜你!
./nasal a.nas
1
2
3
5
8
13
21
34
55
89
144
233
377
610
987
1597
2584
4181
6765
10946
17711
28657
46368
75025
121393
196418
317811
514229
832040
发行日志
version 8.0 release
这个版本的发行版有个 严重的问题:
in nasal_dbg.h:215: auto canary=gc.stack+STACK_MAX_DEPTH-1;
这个会导致不正确的stackoverflow报错。因为它覆盖了原有的变量。
请修改为:
canary=gc.stack+STACK_MAX_DEPTH-1;
如果不修改这一行,调试器运行肯定是不正常的。在v9.0第一个commit中我们修复了这个问题。
另外一个bug在 nasal_err.h:class nasal_err这边,要给这个类添加一个构造函数来进行初始化,否则会出问题:
nasal_err():error(0){}
同样这个也在v9.0中修复了。
语法分析
有特殊语法检查的LL(1)语法分析器。
(var a,b,c)=[{b:nil},[1,2],func return 0;];
(a.b,b[0],c)=(1,2,3);
这两个表达式有同一个first集,所以纯粹的LL(1)很难实现这个语言的语法分析。所以我们为其添加了特殊语法检查机制。本质上还是LL(1)的内核。
上面这个问题已经解决很久了,不过我最近发现了一个新的语法问题:
var f=func(x,y,z){return x+y+z}
(a,b,c)=(0,1,2);
这种写法会被错误识别合并成下面这种:
var f=func(x,y,z){return x+y+z}(a,b,c)
=(0,1,2);
语法分析器会认为这是个严重的语法错误。我在Flightgear中也测试了这个代码,它内置的语法分析器也认为这是错误语法。当然我认为这是语法设计中的一个比较严重的缺漏。为了避免这个语法问题,只需要添加一个分号就可以了:
var f=func(x,y,z){return x+y+z};
                               ^ 就是这里
(a,b,c)=(0,1,2);
version 1.0 parser (last update 2019/10/14)
第一版功能完备的nasal语法分析器完成了。
在version 1.0之前,我多次尝试构建一个正确的语法分析器但是总存在一些问题。
最终我学习了LL(1)和LL(k)文法并且在version 0.16(last update 2019/9/14)中完成了一个能识别数学算式的语法分析器。
在version 0.17(2019/9/15) 0.18(2019/9/18) 0.19(2019/10/1)中我只是抱着玩的心态在测试语法分析器,不过在那之后我还是完成了version 1.0的语法分析器。
该项目于2019/7/25正式开始。
抽象语法树
version 1.2 ast (last update 2019/10/31)
抽象语法树在这个版本初步完成。
version 2.0 ast (last update 2020/8/31)
在这个版本我们基于抽象语法树实现了一个树解释器,并且完成了部分内置函数。
version 3.0 ast (last update 2020/10/23)
我们重构了抽象语法树的代码,现在可以更容易地读懂代码并进行维护。
这个版本的树解释器用了新的优化方式,所以可以更高效地执行代码。
在这个版本用户已经可以自行添加内置函数。
我想在v4.0发布之后仍然保留这个树解释器,毕竟花了很长时间才写完这坨屎。
version 5.0 ast (last update 2021/3/7)
我改变想法了,树解释器给维护带来了太大的麻烦。如果想继续保留这个解释器,那么为了兼容性,字节码虚拟机的优化工作会更难推进。
字节码虚拟机
version 4.0 vm (last update 2020/12/17)
我在这个版本实现了第一版字节码虚拟机。不过这个虚拟机仍然在测试中,在这次测试结束之后,我会发布v4.0发行版。
现在我在找一些隐藏很深的bug。如果有人想帮忙的话,非常欢迎!:)
下面是生成的字节码的样例:
for(var i=0;i<4000000;i+=1);
.number 0
.number 4e+006
.number 1
.symbol i
0x00000000: pzero  0x00000000
0x00000001: loadg  0x00000000 (i)
0x00000002: callg  0x00000000 (i)
0x00000003: pnum   0x00000001 (4e+006)
0x00000004: less   0x00000000
0x00000005: jf     0x0000000b
0x00000006: pone   0x00000000
0x00000007: mcallg 0x00000000 (i)
0x00000008: addeq  0x00000000
0x00000009: pop    0x00000000
0x0000000a: jmp    0x00000002
0x0000000b: nop    0x00000000
version 5.0 vm (last update 2021/3/7)
从这个版本起,我决定持续优化字节码虚拟机。
毕竟现在这玩意从0数到4000000-1要花费1.5秒。这效率完全不能忍。
2021/1/23 update: 现在它确实可以在1.5秒内从0数到4000000-1了。
version 6.0 vm (last update 2021/6/1)
使用loadg/loadl/callg/calll/mcallg/mcalll指令来减少分支语句的调用。
删除了vm_scop类型。
添加作为常量的vm_num来减少内存分配的开销。
将垃圾收集器从引用计数改为了标记清理。
vapp和newf开始使用先前未被使用的.num段来压缩字节码生成数量,减少生成的exec_code的大小。
2021/4/3 update: 从0数到4e6-1只需要不到0.8秒了。
2021/4/19 update: 从0数到4e6-1只需要不到0.4秒了。
在这次的更新中,我把全局变量和局部变量的存储结构从unordered_map变为了vector,从而提升执行效率。所以现在生成的字节码大变样了。
for(var i=0;i<4000000;i+=1);
.number 4e+006
0x00000000: intg   0x00000001
0x00000001: pzero  0x00000000
0x00000002: loadg  0x00000000
0x00000003: callg  0x00000000
0x00000004: pnum   0x00000000 (4e+006)
0x00000005: less   0x00000000
0x00000006: jf     0x0000000c
0x00000007: pone   0x00000000
0x00000008: mcallg 0x00000000
0x00000009: addeq  0x00000000
0x0000000a: pop    0x00000000
0x0000000b: jmp    0x00000003
0x0000000c: nop    0x00000000
version 6.5 vm (last update 2021/6/24)
2021/5/31 update:
Now gc can collect garbage correctly without re-collecting, which will cause fatal error.
Add builtin_alloc to avoid mark-sweep when running a built-in function,
which will mark useful items as useless garbage to collect.
Better use setsize and assignment to get a big array,
append is very slow in this situation.
2021/6/3 update:
Fixed a bug that gc still re-collects garbage, this time i use three mark states to make sure garbage is ready to be collected.
Change callf to callfv and callfh.
And callfv fetches arguments from val_stack directly instead of using vm_vec,
a not very efficient way.
Better use callfv instead of callfh,
callfh will fetch a vm_hash from stack and parse it,
making this process slow.
var f=func(x,y){return x+y;}
f(1024,2048);
.number 1024
.number 2048
.symbol x
.symbol y
0x00000000: intg   0x00000001
0x00000001: newf   0x00000007
0x00000002: intl   0x00000003
0x00000003: offset 0x00000001
0x00000004: para   0x00000000 (x)
0x00000005: para   0x00000001 (y)
0x00000006: jmp    0x0000000b
0x00000007: calll  0x00000001
0x00000008: calll  0x00000002
0x00000009: add    0x00000000
0x0000000a: ret    0x00000000
0x0000000b: loadg  0x00000000
0x0000000c: callg  0x00000000
0x0000000d: pnum   0x00000000 (1024)
0x0000000e: pnum   0x00000001 (2048)
0x0000000f: callfv 0x00000002
0x00000010: pop    0x00000000
0x00000011: nop    0x00000000
2021/6/21 update: Now gc will not collect nullptr. And the function of assignment is complete, now these kinds of assignment is allowed:
var f=func()
{
    var _=[{_:0},{_:1}];
    return func(x)
    {
        return _[x];
    }
}
var m=f();
m(0)._=m(1)._=10;

[0,1,2][1:2][0]=0;
In the old version, parser will check this left-value and tells that these kinds of left-value are not allowed(bad lvalue).
But now it can work.
And you could see its use by reading the code above.
To make sure this assignment works correctly,
codegen will generate byte code by nasal_codegen::call_gen() instead of nasal_codegen::mcall_gen(),
and the last child of the ast will be generated by nasal_codegen::mcall_gen().
So the bytecode is totally different now:
.number 10
.number 2
.symbol _
.symbol x
0x00000000: intg   0x00000002
0x00000001: newf   0x00000005
0x00000002: intl   0x00000002
0x00000003: offset 0x00000001
0x00000004: jmp    0x00000017
0x00000005: newh   0x00000000
0x00000006: pzero  0x00000000
0x00000007: happ   0x00000000 (_)
0x00000008: newh   0x00000000
0x00000009: pone   0x00000000
0x0000000a: happ   0x00000000 (_)
0x0000000b: newv   0x00000002
0x0000000c: loadl  0x00000001
0x0000000d: newf   0x00000012
0x0000000e: intl   0x00000003
0x0000000f: offset 0x00000002
0x00000010: para   0x00000001 (x)
0x00000011: jmp    0x00000016
0x00000012: calll  0x00000001
0x00000013: calll  0x00000002
0x00000014: callv  0x00000000
0x00000015: ret    0x00000000
0x00000016: ret    0x00000000
0x00000017: loadg  0x00000000
0x00000018: callg  0x00000000
0x00000019: callfv 0x00000000
0x0000001a: loadg  0x00000001
0x0000001b: pnum   0x00000000 (10.000000)
0x0000001c: callg  0x00000001
0x0000001d: pone   0x00000000
0x0000001e: callfv 0x00000001
0x0000001f: mcallh 0x00000000 (_)
0x00000020: meq    0x00000000
0x00000021: callg  0x00000001
0x00000022: pzero  0x00000000
0x00000023: callfv 0x00000001
0x00000024: mcallh 0x00000000 (_)
0x00000025: meq    0x00000000
0x00000026: pop    0x00000000
0x00000027: pzero  0x00000000
0x00000028: pzero  0x00000000
0x00000029: pone   0x00000000
0x0000002a: pnum   0x00000001 (2.000000)
0x0000002b: newv   0x00000003
0x0000002c: slcbeg 0x00000000
0x0000002d: pone   0x00000000
0x0000002e: pnum   0x00000001 (2.000000)
0x0000002f: slc2   0x00000000
0x00000030: slcend 0x00000000
0x00000031: pzero  0x00000000
0x00000032: mcallv 0x00000000
0x00000033: meq    0x00000000
0x00000034: pop    0x00000000
0x00000035: nop    0x00000000
As you could see from the bytecode above,
mcall/mcallv/mcallh operands' using frequency will reduce,
call/callv/callh/callfv/callfh at the opposite.
And because of the new structure of mcall,
addr_stack, a stack used to store the memory address,
is deleted from nasal_vm,
and now nasal_vm use nasal_val** mem_addr to store the memory address.
This will not cause fatal errors because the memory address is used immediately after getting it.
version 7.0 vm (last update 2021/10/8)
2021/6/26 update:
Instruction dispatch is changed from call-threading to computed-goto(with inline function). After changing the way of instruction dispatch, there is a great improvement in nasal_vm. Now vm can run test/bigloop and test/pi in 0.2s! And vm runs test/fib in 0.8s on linux. You could see the time use data below, in Test data section.
This version uses g++ extension "labels as values", which is also supported by clang++. (But i don't know if MSVC supports this)
There is also a change in nasal_gc:
std::vector global is deleted,
now the global values are all stored on stack(from val_stack+0 to val_stack+intg-1).
2021/6/29 update:
Add some instructions that execute const values:
op_addc,op_subc,op_mulc,op_divc,op_lnkc,op_addeqc,op_subeqc,op_muleqc,op_diveqc,op_lnkeqc.
Now the bytecode of test/bigloop.nas seems like this:
.number 4e+006
.number 1
0x00000000: intg   0x00000001
0x00000001: pzero  0x00000000
0x00000002: loadg  0x00000000
0x00000003: callg  0x00000000
0x00000004: pnum   0x00000000 (4000000)
0x00000005: less   0x00000000
0x00000006: jf     0x0000000b
0x00000007: mcallg 0x00000000
0x00000008: addeqc 0x00000001 (1)
0x00000009: pop    0x00000000
0x0000000a: jmp    0x00000003
0x0000000b: nop    0x00000000
And this test file runs in 0.1s after this update. Most of the calculations are accelerated.
Also, assignment bytecode has changed a lot.
Now the first identifier that called in assignment will use op_load to assign,
instead of op_meq,op_pop.
var (a,b)=(1,2);
a=b=0;
.number 2
0x00000000: intg   0x00000002
0x00000001: pone   0x00000000
0x00000002: loadg  0x00000000
0x00000003: pnum   0x00000000 (2)
0x00000004: loadg  0x00000001
0x00000005: pzero  0x00000000
0x00000006: mcallg 0x00000001
0x00000007: meq    0x00000000 (b=2 use meq,pop->a)
0x00000008: loadg  0x00000000 (a=b use loadg)
0x00000009: nop    0x00000000
version 8.0 vm (last update 2022/2/12)
2021/10/8 update:
In this version vm_nil and vm_num now is not managed by nasal_gc,
this will decrease the usage of gc::alloc and increase the efficiency of execution.
New value type is added: vm_obj.
This type is reserved for user to define their own value types.
Related API will be added in the future.
Fully functional closure:
Add new operands that get and set upvalues.
Delete an old operand op_offset.
2021/10/13 update:
The format of output information of bytecodes changes to this:
0x000002e6: newf   0x2ea
0x000002e7: intl   0x2
0x000002e8: para   0x6e ("f")
0x000002e9: jmp    0x2ee
0x000002ea: calll  0x1
0x000002eb: calll  0x1
0x000002ec: callfv 0x1
0x000002ed: ret
0x000002ee: newf   0x2f2
0x000002ef: intl   0x2
0x000002f0: para   0x6e ("f")
0x000002f1: jmp    0x30a
0x000002f2: newf   0x2f6
0x000002f3: intl   0x2
0x000002f4: para   0x3e ("x")
0x000002f5: jmp    0x309
0x000002f6: calll  0x1
0x000002f7: lessc  0x0 (2)
0x000002f8: jf     0x2fb
0x000002f9: calll  0x1
0x000002fa: ret
0x000002fb: upval  0x0[0x1]
0x000002fc: upval  0x0[0x1]
0x000002fd: callfv 0x1
0x000002fe: calll  0x1
0x000002ff: subc   0x1d (1)
0x00000300: callfv 0x1
0x00000301: upval  0x0[0x1]
0x00000302: upval  0x0[0x1]
0x00000303: callfv 0x1
0x00000304: calll  0x1
0x00000305: subc   0x0 (2)
0x00000306: callfv 0x1
0x00000307: add
0x00000308: ret
0x00000309: ret
0x0000030a: callfv 0x1
0x0000030b: loadg  0x32
2022/1/22 update:
Delete op_pone and op_pzero.
Both of them are meaningless and will be replaced by op_pnum.
version 9.0 vm (last update 2022/5/18)
2022/2/12 update:
Local values now are stored on stack.
So function calling will be faster than before.
Because in v8.0 when calling a function,
new vm_vec will be allocated by nasal_gc, this makes gc doing mark-sweep too many times and spends a quite lot of time.
In test file test/bf.nas, it takes too much time to test the file because this file has too many function calls(see test data below in table version 8.0 (R9-5900HX ubuntu-WSL 2022/1/23)).
Upvalue now is generated when creating first new function in the local scope, using vm_vec.
And after that when creating new functions, they share the same upvalue, and the upvalue will synchronize with the local scope each time creating a new function.
2022/3/27 update:
In this month's updates we change upvalue from vm_vec to vm_upval,
a special gc-managed object,
which has almost the same structure of that upvalue object in another programming language Lua.
Today we change the output format of bytecode.
New output format looks like objdump:
  0x0000029b:       0a 00 00 00 00        newh

func <0x29c>:
  0x0000029c:       0b 00 00 02 a0        newf    0x2a0
  0x0000029d:       02 00 00 00 02        intl    0x2
  0x0000029e:       0d 00 00 00 66        para    0x66 ("libname")
  0x0000029f:       32 00 00 02 a2        jmp     0x2a2
  0x000002a0:       40 00 00 00 42        callb   0x42 <__builtin_dlopen@0x41dc40>
  0x000002a1:       4a 00 00 00 00        ret
<0x29c>;

  0x000002a2:       0c 00 00 00 67        happ    0x67 ("dlopen")

func <0x2a3>:
  0x000002a3:       0b 00 00 02 a8        newf    0x2a8
  0x000002a4:       02 00 00 00 03        intl    0x3
  0x000002a5:       0d 00 00 00 68        para    0x68 ("lib")
  0x000002a6:       0d 00 00 00 69        para    0x69 ("sym")
  0x000002a7:       32 00 00 02 aa        jmp     0x2aa
  0x000002a8:       40 00 00 00 43        callb   0x43 <__builtin_dlsym@0x41df00>
  0x000002a9:       4a 00 00 00 00        ret
<0x2a3>;

  0x000002aa:       0c 00 00 00 6a        happ    0x6a ("dlsym")

func <0x2ab>:
  0x000002ab:       0b 00 00 02 af        newf    0x2af
  0x000002ac:       02 00 00 00 02        intl    0x2
  0x000002ad:       0d 00 00 00 68        para    0x68 ("lib")
  0x000002ae:       32 00 00 02 b1        jmp     0x2b1
  0x000002af:       40 00 00 00 44        callb   0x44 <__builtin_dlclose@0x41e2a0>
  0x000002b0:       4a 00 00 00 00        ret
<0x2ab>;

  0x000002b1:       0c 00 00 00 6b        happ    0x6b ("dlclose")

func <0x2b2>:
  0x000002b2:       0b 00 00 02 b7        newf    0x2b7
  0x000002b3:       02 00 00 00 03        intl    0x3
  0x000002b4:       0d 00 00 00 6c        para    0x6c ("funcptr")
  0x000002b5:       0f 00 00 00 6d        dyn     0x6d ("args")
  0x000002b6:       32 00 00 02 b9        jmp     0x2b9
  0x000002b7:       40 00 00 00 45        callb   0x45 <__builtin_dlcall@0x41e3d0>
  0x000002b8:       4a 00 00 00 00        ret
<0x2b2>;

  0x000002b9:       0c 00 00 00 6e        happ    0x6e ("dlcall")
  0x000002ba:       03 00 00 00 21        loadg   0x21
  0x000002bb:       0a 00 00 00 00        newh

func <0x2bc>:
  0x000002bc:       0b 00 00 02 bf        newf    0x2bf
  0x000002bd:       02 00 00 00 01        intl    0x1
  0x000002be:       32 00 00 02 c1        jmp     0x2c1
  0x000002bf:       40 00 00 00 46        callb   0x46 <__builtin_platform@0x41e4f0>
  0x000002c0:       4a 00 00 00 00        ret
<0x2bc>;

  0x000002c1:       0c 00 00 00 6f        happ    0x6f ("platform")
  0x000002c2:       03 00 00 00 22        loadg   0x22
  0x000002c3:       0a 00 00 00 00        newh

func <0x2c4>:
  0x000002c4:       0b 00 00 02 c7        newf    0x2c7
  0x000002c5:       02 00 00 00 01        intl    0x1
  0x000002c6:       32 00 00 02 c9        jmp     0x2c9
  0x000002c7:       40 00 00 00 47        callb   0x47 <__builtin_gc@0x41e530>
  0x000002c8:       4a 00 00 00 00        ret
<0x2c4>;

  0x000002c9:       0c 00 00 00 70        happ    0x70 ("gc")
  0x000002ca:       03 00 00 00 23        loadg   0x23
version 10.0 vm (latest)
2022/5/19 update:
Now we add coroutine in this runtime:
var coroutine={
    create: func(function){return __builtin_cocreate;},
    resume: func(co)      {return __builtin_coresume;},
    yield:  func(args...) {return __builtin_coyield; },
    status: func(co)      {return __builtin_costatus;},
    running:func()        {return __builtin_corun;   }
};
coroutine.create is used to create a new coroutine object using a function.
But this coroutine will not run immediately.
coroutine.resume is used to continue running a coroutine.
coroutine.yield is used to interrupt the running of a coroutine and throw some values.
These values will be accepted and returned by coroutine.resume.
And coroutine.yield it self returns vm_nil in the coroutine function.
coroutine.status is used to see the status of a coroutine.
There are 3 types of status:suspended means waiting for running,running means is running,dead means finished running.
coroutine.running is used to judge if there is a coroutine running now.
CAUTION: coroutine should not be created or running inside another coroutine.
We will explain how resume and yield work here:
When op_callb is called, the stack frame is like this:
+----------------------------+(main stack)
| old pc(vm_ret)             | <- top[0]
+----------------------------+
| old localr(vm_addr)        | <- top[-1]
+----------------------------+
| old upvalr(vm_upval)       | <- top[-2]
+----------------------------+
| local scope(nasal_ref)     |
| ...                        |
+----------------------------+ <- local pointer stored in localr
| old funcr(vm_func)         | <- old function stored in funcr
+----------------------------+
In op_callb's progress, next step the stack frame is:
+----------------------------+(main stack)
| nil(vm_nil)                | <- push nil
+----------------------------+
| old pc(vm_ret)             |
+----------------------------+
| old localr(vm_addr)        |
+----------------------------+
| old upvalr(vm_upval)       |
+----------------------------+
| local scope(nasal_ref)     |
| ...                        |
+----------------------------+ <- local pointer stored in localr
| old funcr(vm_func)         | <- old function stored in funcr
+----------------------------+
Then we call resume, this function will change stack.
As we can see, coroutine stack already has some values on it,
but if we first enter it, the stack top will be vm_ret, and the return pc is 0.
So for safe running, resume will return gc.top[0].
op_callb will do top[0]=resume(), so the value does not change.
+----------------------------+(coroutine stack)
| pc:0(vm_ret)               | <- now gc.top[0]
+----------------------------+
When we call yield, the function will do like this.
And we find that op_callb has put the nil at the top.
but where is the returned local[1] sent?
+----------------------------+(coroutine stack)
| nil(vm_nil)                | <- push nil
+----------------------------+
| old pc(vm_ret)             |
+----------------------------+
| old localr(vm_addr)        |
+----------------------------+
| old upvalr(vm_upval)       |
+----------------------------+
| local scope(nasal_ref)     |
| ...                        |
+----------------------------+ <- local pointer stored in localr
| old funcr(vm_func)         | <- old function stored in funcr
+----------------------------+
When builtin_coyield is finished, the stack is set to main stack,
and the returned local[1] in fact is set to the top of the main stack by op_callb:
+----------------------------+(main stack)
| return_value(nasal_ref)    |
+----------------------------+
| old pc(vm_ret)             |
+----------------------------+
| old localr(vm_addr)        |
+----------------------------+
| old upvalr(vm_upval)       |
+----------------------------+
| local scope(nasal_ref)     |
| ...                        |
+----------------------------+ <- local pointer stored in localr
| old funcr(vm_func)         | <- old function stored in funcr
+----------------------------+
so the main progress feels the value on the top is the returned value of resume.
but in fact the resume's returned value is set on coroutine stack.
so we conclude this:
resume (main->coroutine) return coroutine.top[0]. coroutine.top[0] = coroutine.top[0];
yield  (coroutine->main) return a vector.         main.top[0]      = vector;
Benchmark
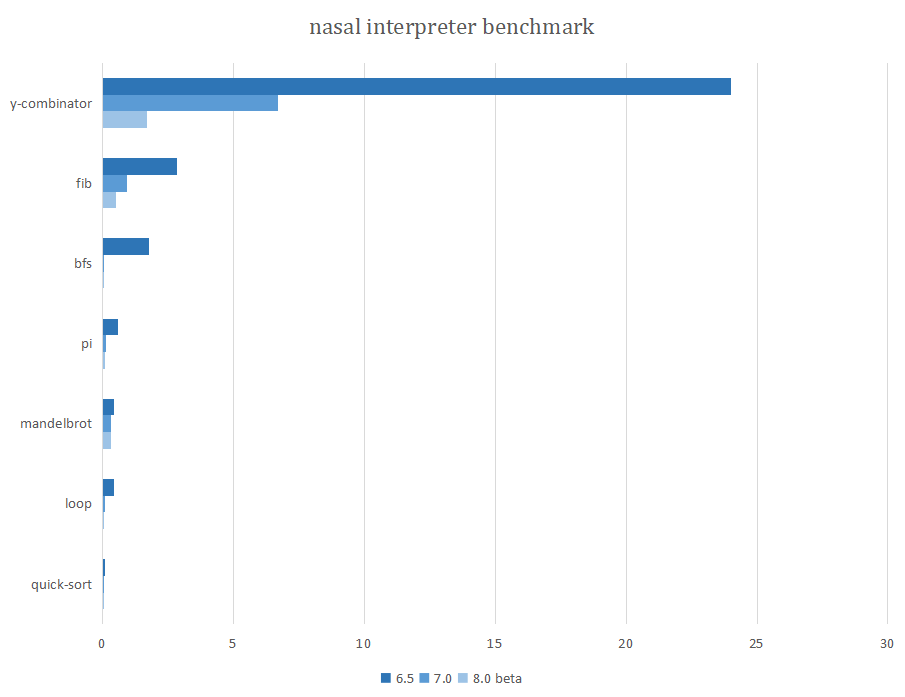
version 6.5 (i5-8250U windows10 2021/6/19)
running time and gc time:
| file | call gc | total time | gc time |
|---|---|---|---|
| pi.nas | 12000049 | 0.593s | 0.222s |
| fib.nas | 10573747 | 2.838s | 0.187s |
| bp.nas | 4419829 | 1.99s | 0.18s |
| bigloop.nas | 4000000 | 0.419s | 0.039s |
| mandelbrot.nas | 1044630 | 0.433s | 0.041s |
| life.nas | 817112 | 8.557s | 0.199s |
| ascii-art.nas | 45612 | 0.48s | 0.027s |
| calc.nas | 8089 | 0.068s | 0.006s |
| quick_sort.nas | 2768 | 0.107s | 0s |
| bfs.nas | 2471 | 1.763s | 0.003s |
operands calling frequency:
| file | 1st | 2nd | 3rd | 4th | 5th |
|---|---|---|---|---|---|
| pi.nas | callg | pop | mcallg | pnum | pone |
| fib.nas | calll | pnum | callg | less | jf |
| bp.nas | calll | callg | pop | callv | addeq |
| bigloop.nas | pnum | less | jf | callg | pone |
| mandelbrot.nas | callg | mult | loadg | pnum | pop |
| life.nas | calll | callv | pnum | jf | callg |
| ascii-art.nas | calll | pop | mcalll | callg | callb |
| calc.nas | calll | pop | pstr | mcalll | jmp |
| quick_sort.nas | calll | pop | jt | jf | less |
| bfs.nas | calll | pop | callv | mcalll | jf |
operands calling total times:
| file | 1st | 2nd | 3rd | 4th | 5th |
|---|---|---|---|---|---|
| pi.nas | 6000004 | 6000003 | 6000000 | 4000005 | 4000002 |
| fib.nas | 17622792 | 10573704 | 7049218 | 7049155 | 7049155 |
| bp.nas | 7081480 | 4227268 | 2764676 | 2617112 | 2065441 |
| bigloop.nas | 4000001 | 4000001 | 4000001 | 4000001 | 4000000 |
| mandelbrot.nas | 1519632 | 563856 | 290641 | 286795 | 284844 |
| life.nas | 2114371 | 974244 | 536413 | 534794 | 489743 |
| ascii-art.nas | 37906 | 22736 | 22402 | 18315 | 18292 |
| calc.nas | 191 | 124 | 109 | 99 | 87 |
| quick_sort.nas | 16226 | 5561 | 4144 | 3524 | 2833 |
| bfs.nas | 24707 | 16297 | 14606 | 14269 | 8672 |
version 7.0 (i5-8250U ubuntu-WSL on windows10 2021/6/29)
running time:
| file | total time | info |
|---|---|---|
| pi.nas | 0.15625s | great improvement |
| fib.nas | 0.75s | great improvement |
| bp.nas | 0.4218s(7162 epoch) | good improvement |
| bigloop.nas | 0.09375s | great improvement |
| mandelbrot.nas | 0.0312s | great improvement |
| life.nas | 8.80s(windows) 1.25(ubuntu WSL) | little improvement |
| ascii-art.nas | 0.015s | little improvement |
| calc.nas | 0.0468s | little improvement |
| quick_sort.nas | 0s | great improvement |
| bfs.nas | 0.0156s | great improvement |
version 8.0 (R9-5900HX ubuntu-WSL 2022/1/23)
running time:
| file | total time | info |
|---|---|---|
| bf.nas | 1100.19s | |
| mandel.nas | 28.98s | |
| life.nas | 0.56s | 0.857s(windows) |
| ycombinator.nas | 0.64s | |
| fib.nas | 0.28s | |
| bfs.nas | 0.156s | random result |
| pi.nas | 0.0625s | |
| bigloop.nas | 0.047s | |
| calc.nas | 0.03125s | changed test file |
| mandelbrot.nas | 0.0156s | |
| ascii-art.nas | 0s | |
| quick_sort.nas | 0s |
version 9.0 (R9-5900HX ubuntu-WSL 2022/2/13)
running time:
| file | total time | info |
|---|---|---|
| bf.nas | 276.55s | great improvement |
| mandel.nas | 28.16s | |
| ycombinator.nas | 0.59s | |
| life.nas | 0.2s | 0.649s(windows) |
| fib.nas | 0.234s | little improvement |
| bfs.nas | 0.14s | random result |
| pi.nas | 0.0625s | |
| bigloop.nas | 0.047s | |
| calc.nas | 0.0469s | changed test file |
| quick_sort.nas | 0.016s | changed test file:100->1e4 |
| mandelbrot.nas | 0.0156s | |
| ascii-art.nas | 0s |
bf.nas is a very interesting test file that there is a brainfuck interpreter written in nasal.
And we use this bf interpreter to draw a mandelbrot set.
In 2022/2/17 update we added \e into the lexer. And the bfcolored.nas uses this special ASCII code. Here is the result:

Difference Between Andy's and This Interpreter
1. must use var to define variables
This interpreter uses more strict syntax to make sure it is easier for you to program and debug.
In Andy's interpreter:
import("lib.nas");
foreach(i;[0,1,2,3])
    print(i)
This program can run normally with output 0 1 2 3. But take a look at the iterator 'i', this symbol is defined in foreach without using keyword 'var'. I think this design will make programmers filling confused. This is ambiguous that programmers maybe difficult to find the 'i' is defined here. Without 'var', programmers may think this 'i' is defined anywhere else.
So in this new interpreter i use a more strict syntax to force users to use 'var' to define iterator of forindex and foreach. If you forget to add the keyword 'var', and you haven't defined this symbol before, you will get this:
[code] test.nas:2 undefined symbol "i".
foreach(i;[0,1,2,3])
[code] test.nas:3 undefined symbol "i".
    print(i)
2. (now supported) couldn't use variables before definitions
(Outdated: this is now supported) Also there's another difference. In Andy's interpreter:
var a=func {print(b);}
var b=1;
a();
This program runs normally with output 1. But in this new interpreter, it will get:
[code] test.nas:1 undefined symbol "b".
var a=func {print(b);}
This difference is caused by different kinds of ways of lexical analysis. In most script language interpreters, they use dynamic analysis to check if this symbol is defined yet. However, this kind of analysis is at the cost of lower efficiency. To make sure the interpreter runs at higher efficiency, i choose static analysis to manage the memory space of each symbol. By this way, runtime will never need to check if a symbol exists or not. But this causes a difference. You will get an error of 'undefined symbol', instead of nothing happening in most script language interpreters.
This change is controversial among FGPRC's members. So maybe in the future i will use dynamic analysis again to cater to the habits of senior programmers.
(2021/8/3 update) Now i use scanning ast twice to reload symbols. So this difference does not exist from this update. But a new difference is that if you call a variable before defining it, you'll get nil instead of 'undefined error'.
3. default dynamic arguments not supported
In this new interpreter,
function doesn't put dynamic arguments into vector arg automatically.
So if you use arg without definition,
you'll get an error of undefined symbol.
Trace Back Info
When the interpreter crashes, it will print trace back information:
1. native function die
Function die is used to throw error and crash immediately.
func()
{
    println("hello");
    die("error occurred this line");
    return;
}();
hello
[vm] error: error occurred this line
[vm] native function error.
trace back:
        0x000000ac:     40 00 00 00 25      callb  0x25 <__builtin_die@0x41afc0> (lib.nas:131)
        0x000004f6:     3e 00 00 00 01      callfv 0x1 (a.nas:4)
        0x000004fa:     3e 00 00 00 00      callfv 0x0 (a.nas:6)
vm stack(0x7fffcd21bc68<sp+80>, limit 10, total 12):
  0x0000005b    | null |
  0x0000005a    | pc   | 0x4f6
  0x00000059    | addr | 0x7fffcd21bc78
  0x00000058    | nil  |
  0x00000057    | str  | <0x138ff60> error occurred t...
  0x00000056    | nil  |
  0x00000055    | func | <0x13445b0> entry:0x4f0
  0x00000054    | pc   | 0x4fa
  0x00000053    | addr | 0x0
  0x00000052    | nil  |
2. stack overflow crash info
Here is an example of stack overflow:
func(f){
    return f(f);
}(
    func(f){
        f(f);
    }
)();
[vm] stack overflow
trace back:
        0x000004fb:     3e 00 00 00 01      callfv 0x1 (a.nas:5)
        0x000004fb:     1349 same call(s)
        0x000004f3:     3e 00 00 00 01      callfv 0x1 (a.nas:2)
        0x000004ff:     3e 00 00 00 01      callfv 0x1 (a.nas:3)
vm stack(0x7fffd3781d58<sp+80>, limit 10, total 8108):
  0x00001ffb    | func | <0x15f8d90> entry:0x4f9
  0x00001ffa    | func | <0x15f8d90> entry:0x4f9
  0x00001ff9    | pc   | 0x4fb
  0x00001ff8    | addr | 0x7fffd37a1748
  0x00001ff7    | nil  |
  0x00001ff6    | func | <0x15f8d90> entry:0x4f9
  0x00001ff5    | nil  |
  0x00001ff4    | func | <0x15f8d90> entry:0x4f9
  0x00001ff3    | pc   | 0x4fb
  0x00001ff2    | addr | 0x7fffd37a16e8
3. normal vm error crash info
Error will be thrown if there's a fatal error when executing:
func(){
    return 0;
}()[1];
[vm] callv: must call a vector/hash/string
trace back:
        0x000004f4:     3b 00 00 00 00      callv  0x0 (a.nas:3)
vm stack(0x7fffff539c28<sp+80>, limit 10, total 1):
  0x00000050    | num  | 0
4. detailed crash info
Use command -d or --detail the trace back info will show more details:
hello
[vm] error: error occurred this line
[vm] native function error.
trace back:
        0x000000ac:     40 00 00 00 25      callb  0x25 <__builtin_die@0x41afc0> (lib.nas:131)
        0x000004f6:     3e 00 00 00 01      callfv 0x1 (a.nas:4)
        0x000004fa:     3e 00 00 00 00      callfv 0x0 (a.nas:6)
vm stack(0x7ffff42f3d08<sp+80>, limit 10, total 12):
  0x0000005b    | null |
  0x0000005a    | pc   | 0x4f6
  0x00000059    | addr | 0x7ffff42f3d18
  0x00000058    | nil  |
  0x00000057    | str  | <0x1932480> error occurred t...
  0x00000056    | nil  |
  0x00000055    | func | <0x18e6ad0> entry:0x4f0
  0x00000054    | pc   | 0x4fa
  0x00000053    | addr | 0x0
  0x00000052    | nil  |
registers(main):
  [ pc     ]    | pc   | 0xac
  [ global ]    | addr | 0x7ffff42f3808
  [ localr ]    | addr | 0x7ffff42f3d68
  [ memr   ]    | addr | 0x0
  [ funcr  ]    | func | <0x18fbe50> entry:0xac
  [ upvalr ]    | nil  |
  [ canary ]    | addr | 0x7ffff43137f8
  [ top    ]    | addr | 0x7ffff42f3db8
global(0x7ffff42f3808<sp+0>):
  0x00000000    | func | <0x18d62d0> entry:0x5
  0x00000001    | func | <0x18d7e40> entry:0xc
  0x00000002    | func | <0x18d63f0> entry:0x14
  0x00000003    | func | <0x18d6490> entry:0x1c
  0x00000004    | func | <0x18d6530> entry:0x23
  0x00000005    | func | <0x18d65d0> entry:0x29
  0x00000006    | func | <0x18d6670> entry:0x31
  0x00000007    | func | <0x18d6710> entry:0x39
  0x00000008    | func | <0x18d67b0> entry:0x40
  0x00000009    | func | <0x18d6850> entry:0x47
  0x0000000a    | func | <0x18d7e60> entry:0x4e
  0x0000000b    | func | <0x18cb4e0> entry:0x54
  0x0000000c    | func | <0x18cb580> entry:0x5d
  0x0000000d    | func | <0x18cb620> entry:0x6a
  0x0000000e    | func | <0x18cb6c0> entry:0x71
  0x0000000f    | func | <0x18cb760> entry:0x78
  0x00000010    | func | <0x18cb800> entry:0x7f
  0x00000011    | func | <0x18cb8a0> entry:0x87
  0x00000012    | func | <0x18cb940> entry:0x8f
  0x00000013    | func | <0x18cb9e0> entry:0x96
  0x00000014    | func | <0x18cba80> entry:0x9d
  0x00000015    | func | <0x18fbdb0> entry:0xa3
  0x00000016    | func | <0x18fbe50> entry:0xac
  0x00000017    | func | <0x18fbef0> entry:0xb4
  0x00000018    | func | <0x18fbf90> entry:0xbb
  0x00000019    | func | <0x18fc030> entry:0xc5
  0x0000001a    | func | <0x18fc0d0> entry:0xdc
  0x0000001b    | func | <0x18fc170> entry:0xe4
  0x0000001c    | func | <0x18fc210> entry:0xec
  0x0000001d    | func | <0x18fc2b0> entry:0xf4
  0x0000001e    | func | <0x18fc350> entry:0xfc
  0x0000001f    | func | <0x18cbaa0> entry:0x103
  0x00000020    | func | <0x18f3630> entry:0x10a
  0x00000021    | func | <0x18f36d0> entry:0x111
  0x00000022    | func | <0x18f3770> entry:0x11e
  0x00000023    | func | <0x18f3810> entry:0x125
  0x00000024    | func | <0x18f38b0> entry:0x131
  0x00000025    | func | <0x18f3950> entry:0x13c
  0x00000026    | func | <0x18f39f0> entry:0x147
  0x00000027    | func | <0x18f3a90> entry:0x152
  0x00000028    | func | <0x18f3b30> entry:0x15d
  0x00000029    | func | <0x18f3bd0> entry:0x174
  0x0000002a    | func | <0x18f3c70> entry:0x18d
  0x0000002b    | func | <0x18f6710> entry:0x198
  0x0000002c    | func | <0x18f67b0> entry:0x1a4
  0x0000002d    | func | <0x18f6850> entry:0x1bd
  0x0000002e    | func | <0x18f68f0> entry:0x1e9
  0x0000002f    | func | <0x18f6990> entry:0x1fb
  0x00000030    | func | <0x18f6a30> entry:0x20c
  0x00000031    | func | <0x18f6ad0> entry:0x237
  0x00000032    | hash | <0x191f780> {14 val}
  0x00000033    | func | <0x18df660> entry:0x29b
  0x00000034    | hash | <0x191f7a0> {9 val}
  0x00000035    | hash | <0x191f7c0> {18 val}
  0x00000036    | hash | <0x191f7e0> {16 val}
  0x00000037    | hash | <0x191f800> {4 val}
  0x00000038    | hash | <0x191f820> {1 val}
  0x00000039    | hash | <0x191f840> {1 val}
  0x0000003a    | num  | 0.0174533
  0x0000003b    | num  | 0.5925
  0x0000003c    | num  | 0.3048
  0x0000003d    | num  | 3.7854
  0x0000003e    | num  | 0.0254
  0x0000003f    | num  | 2.2046
  0x00000040    | num  | 1.6878
  0x00000041    | num  | 0.5144
  0x00000042    | num  | 0.2642
  0x00000043    | num  | 0.4536
  0x00000044    | num  | 3.2808
  0x00000045    | num  | 39.3701
  0x00000046    | num  | 0.00054
  0x00000047    | num  | 1.9438
  0x00000048    | num  | 1852
  0x00000049    | num  | 57.2958
  0x0000004a    | func | <0x18e6490> entry:0x489
  0x0000004b    | func | <0x18e6530> entry:0x49c
  0x0000004c    | func | <0x18e65d0> entry:0x4a8
  0x0000004d    | func | <0x18e6670> entry:0x4b5
  0x0000004e    | func | <0x18e6710> entry:0x4c2
  0x0000004f    | hash | <0x191f8b0> {5 val}
local(0x7ffff42f3d68<sp+86>):
  0x00000000    | nil  |
  0x00000001    | str  | <0x1932480> error occurred t...
Debugger
In nasal v8.0 we added a debugger. Now we could see both source code and bytecode when testing program.
Use command ./nasal -dbg xxx.nas to use the debugger,
and the debugger will print this:
[debug] nasal debug mode
input 'h' to get help

source code:
-->     import("lib.nas");
        var fib=func(x)
        {
                if(x<2) return x;
                return fib(x-1)+fib(x-2);
        }
        for(var i=0;i<31;i+=1)
                print(fib(i),'\n');
next bytecode:
-->     0x00000000:     01 00 00 00 4f      intg   0x4f (a.nas:0)
        0x00000001:     0b 00 00 00 05      newf   0x5 (lib.nas:5)
        0x00000002:     02 00 00 00 02      intl   0x2 (lib.nas:5)
        0x00000003:     0d 00 00 00 00      para   0x0 ("filename") (lib.nas:5)
        0x00000004:     32 00 00 00 07      jmp    0x7 (lib.nas:5)
        0x00000005:     40 00 00 00 24      callb  0x24 <__builtin_import@0x419b20> (lib.nas:6)
        0x00000006:     4a 00 00 00 00      ret    0x0 (lib.nas:6)
        0x00000007:     03 00 00 00 00      loadg  0x0 (lib.nas:5)
vm stack(0x7fffe05e3190<sp+79>, limit 5, total 0)
>>
If want help, input h to get help.
<option>
        h,   help      | get help
        bt,  backtrace | get function call trace
        c,   continue  | run program until break point or exit
        f,   file      | see all the compiled files
        g,   global    | see global values
        l,   local     | see local values
        u,   upval     | see upvalue
        r,   register  | show vm register detail
        a,   all       | show global,local and upvalue
        n,   next      | execute next bytecode
        q,   exit      | exit debugger
<option> <filename> <line>
        bk,  break     | set break point
When running the debugger, you could see what is on stack. This will help you debugging or learning how the vm works:
source code:
        import("lib.nas");
        var fib=func(x)
        {
-->             if(x<2) return x;
                return fib(x-1)+fib(x-2);
        }
        for(var i=0;i<31;i+=1)
                print(fib(i),'\n');
next bytecode:
        0x00000458:     4a 00 00 00 00      ret    0x0 (lib.nas:463)
        0x00000459:     03 00 00 00 4c      loadg  0x4c (lib.nas:463)
        0x0000045a:     0b 00 00 04 5e      newf   0x45e (a.nas:2)
        0x0000045b:     02 00 00 00 02      intl   0x2 (a.nas:2)
        0x0000045c:     0d 00 00 00 1c      para   0x1c ("x") (a.nas:2)
        0x0000045d:     32 00 00 04 6d      jmp    0x46d (a.nas:2)
-->     0x0000045e:     39 00 00 00 01      calll  0x1 (a.nas:4)
        0x0000045f:     2d 00 00 00 02      lessc  0x2 (2) (a.nas:4)
vm stack(0x7fffe05e3190<sp+79>, limit 5, total 6):
  0x00000054    | pc   | 0x476
  0x00000053    | addr | 0x0
  0x00000052    | num  | 0
  0x00000051    | nil  |
  0x00000050    | nil  |
>>