# __Nasal - Modern Interpreter__
 

[](../LICENSE)

[](https://github.com/ValKmjolnir/Nasal-Interpreter/actions/workflows/c-cpp.yml)
> 这篇文档包含多语言版本: [__中文__](../doc/README_zh.md) | [__English__](../README.md)
## __目录__
* [__简介__](#简介)
* [__下载__](#下载)
* [__编译__](#编译)
* [__使用方法__](#使用方法)
* [__教程__](../doc/tutorial_zh.md)
* [__发行日志__](../doc/dev_zh.md#发行日志)
* [__开发历史__](../doc/dev_zh.md)
* [__测试数据__](../doc/benchmark.md)
* [__特殊之处__](#与andy解释器的不同之处)
* [__堆栈追踪信息__](#堆栈追踪信息)
* [__调试器__](#调试器)
* [__交互解释器__](#交互解释器)
__如果有好的意见或建议,欢迎联系我们!__
* __E-mail__:
* __lhk101lhk101@qq.com__ (ValKmjolnir)
* __1467329765@qq.com__(Sidi762)
## __简介__




[Nasal](http://wiki.flightgear.org/Nasal_scripting_language)
是一款语法与 ECMAscript 相似的编程语言,并作为脚本语言被著名开源飞行模拟器 [FlightGear](https://www.flightgear.org/) 所使用。
该语言的设计者为 [Andy Ross](https://github.com/andyross)。
该解释器由 [ValKmjolnir](https://github.com/ValKmjolnir) 使用 `C++`(`-std=c++17`)重新实现。非常感谢 Andy 为我们设计了这个神奇且简洁的编程语言: [Andy Ross 的 nasal 解释器](https://github.com/andyross/nasal)。
该项目旧版本使用 __MIT__ 协议开源 (2019/7 ~ 2021/5/4 ~ 2023/5),从 2023/6 开始新版本使用 __GPL v2__ 协议。
### __为什么重新写 Nasal 解释器?__
2019 年暑假,[FGPRC](https://www.fgprc.org.cn/) 的成员告诉我,在 Flightgear 中提供的 nasal 控制台窗口中进行调试很不方便,仅仅是想检查语法错误,也得花时间打开软件等待加载进去后进行调试。所以我就写了一个全新的解释器来帮助他们检查语法错误以及运行时错误。
我编写了 nasal 的词法分析器和语法分析器,以及一个全新的字节码虚拟机,并用这个运行时来进行 nasal 程序的调试。我们发现使用这个解释器来检测语法和运行时错误极大的提高了效率。
你也可以使用这个语言来写一些与 Flightgear 运行环境无关的有趣的程序,并用这个解释器来执行。你也可以让解释器来调用你自己编写的模块,使它成为项目中一个非常有用的工具。
## __下载__
现在支持下载预览版(Nightly Build)。
Windows 平台的预览版解释器现在还没配置相关流水线,
请耐心等候或者直接在本地编译。
我们提供了一份 Cmake 文件,可以很方便地在 Visual Studio 中编译:
* [macOS-nightly-build](https://github.com/ValKmjolnir/Nasal-Interpreter/releases/tag/next_macOS)
* [linux-nightly-build](https://github.com/ValKmjolnir/Nasal-Interpreter/releases/tag/next_linux_x86_64)
* windows-nightly-build: [施工中...]
## __编译__



推荐下载最新代码包编译,这个项目非常小巧, 没有使用任何第三方库,因此编译起来非常轻松,
只需要这两样东西: C++ 编译器以及make程序。
### __Windows 平台 (MinGW-w64)__

确保 thread model 是 `posix thread model`, 否则没有 thread 库。
> mingw32-make nasal.exe -j4
### __Windows 平台 (Vistual Studio)__

项目提供了 [__CMakeLists.txt__](../CMakeLists.txt) 用于在`Visual Studio`中创建项目。
### __Linux / macOS / Unix 平台__


> make -j
你也可以通过如下的其中一行命令来指定你想要使用的编译器:
> make nasal CXX=... -j
## __使用方法__
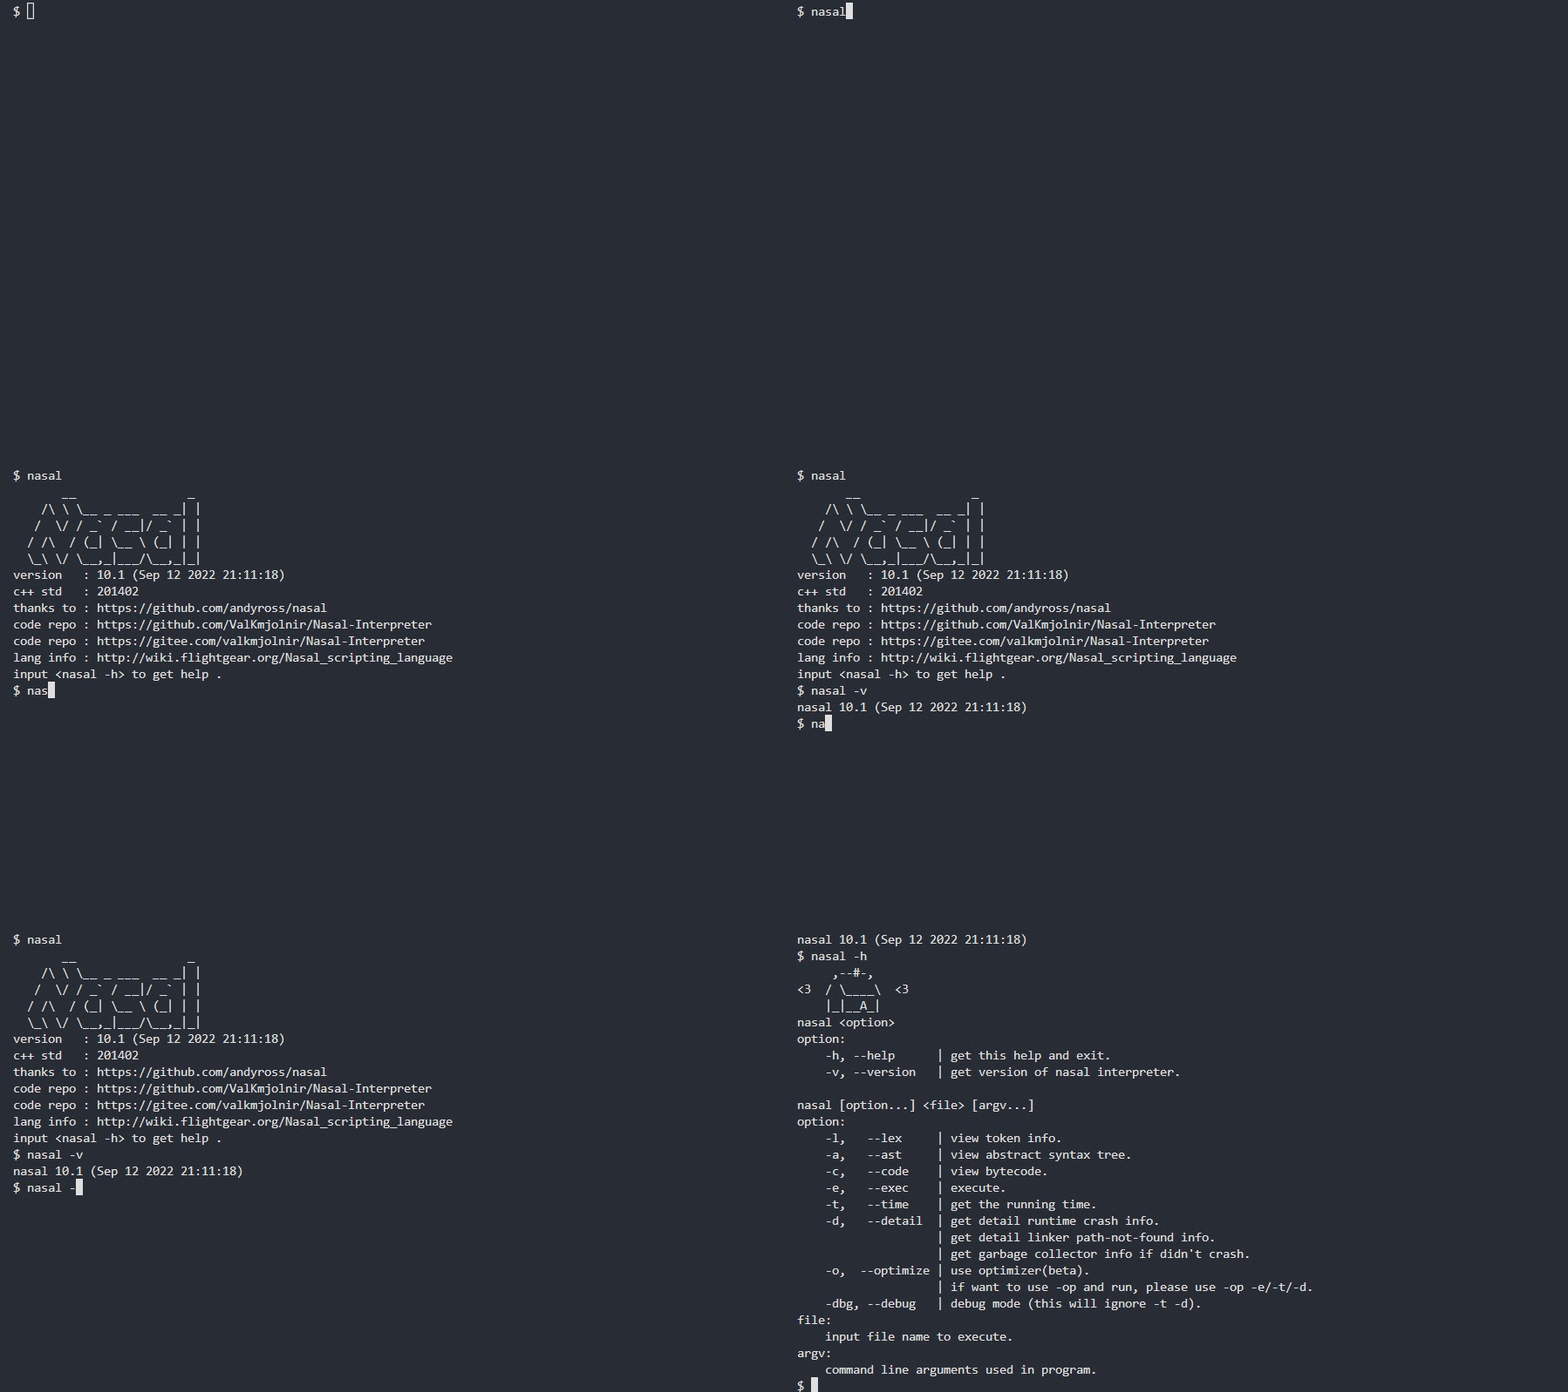
如果你是 `Windows` 用户且想正常输出unicode,在nasal代码里写这个来开启unicode代码页:
```javascript
if (os.platform()=="windows") {
system("chcp 65001");
}
```
## __与andy解释器的不同之处__


[](../LICENSE)

[](https://github.com/ValKmjolnir/Nasal-Interpreter/actions/workflows/c-cpp.yml)
> 这篇文档包含多语言版本: [__中文__](../doc/README_zh.md) | [__English__](../README.md)
## __目录__
* [__简介__](#简介)
* [__下载__](#下载)
* [__编译__](#编译)
* [__使用方法__](#使用方法)
* [__教程__](../doc/tutorial_zh.md)
* [__发行日志__](../doc/dev_zh.md#发行日志)
* [__开发历史__](../doc/dev_zh.md)
* [__测试数据__](../doc/benchmark.md)
* [__特殊之处__](#与andy解释器的不同之处)
* [__堆栈追踪信息__](#堆栈追踪信息)
* [__调试器__](#调试器)
* [__交互解释器__](#交互解释器)
__如果有好的意见或建议,欢迎联系我们!__
* __E-mail__:
* __lhk101lhk101@qq.com__ (ValKmjolnir)
* __1467329765@qq.com__(Sidi762)
## __简介__




[Nasal](http://wiki.flightgear.org/Nasal_scripting_language)
是一款语法与 ECMAscript 相似的编程语言,并作为脚本语言被著名开源飞行模拟器 [FlightGear](https://www.flightgear.org/) 所使用。
该语言的设计者为 [Andy Ross](https://github.com/andyross)。
该解释器由 [ValKmjolnir](https://github.com/ValKmjolnir) 使用 `C++`(`-std=c++17`)重新实现。非常感谢 Andy 为我们设计了这个神奇且简洁的编程语言: [Andy Ross 的 nasal 解释器](https://github.com/andyross/nasal)。
该项目旧版本使用 __MIT__ 协议开源 (2019/7 ~ 2021/5/4 ~ 2023/5),从 2023/6 开始新版本使用 __GPL v2__ 协议。
### __为什么重新写 Nasal 解释器?__
2019 年暑假,[FGPRC](https://www.fgprc.org.cn/) 的成员告诉我,在 Flightgear 中提供的 nasal 控制台窗口中进行调试很不方便,仅仅是想检查语法错误,也得花时间打开软件等待加载进去后进行调试。所以我就写了一个全新的解释器来帮助他们检查语法错误以及运行时错误。
我编写了 nasal 的词法分析器和语法分析器,以及一个全新的字节码虚拟机,并用这个运行时来进行 nasal 程序的调试。我们发现使用这个解释器来检测语法和运行时错误极大的提高了效率。
你也可以使用这个语言来写一些与 Flightgear 运行环境无关的有趣的程序,并用这个解释器来执行。你也可以让解释器来调用你自己编写的模块,使它成为项目中一个非常有用的工具。
## __下载__
现在支持下载预览版(Nightly Build)。
Windows 平台的预览版解释器现在还没配置相关流水线,
请耐心等候或者直接在本地编译。
我们提供了一份 Cmake 文件,可以很方便地在 Visual Studio 中编译:
* [macOS-nightly-build](https://github.com/ValKmjolnir/Nasal-Interpreter/releases/tag/next_macOS)
* [linux-nightly-build](https://github.com/ValKmjolnir/Nasal-Interpreter/releases/tag/next_linux_x86_64)
* windows-nightly-build: [施工中...]
## __编译__



推荐下载最新代码包编译,这个项目非常小巧, 没有使用任何第三方库,因此编译起来非常轻松,
只需要这两样东西: C++ 编译器以及make程序。
### __Windows 平台 (MinGW-w64)__

确保 thread model 是 `posix thread model`, 否则没有 thread 库。
> mingw32-make nasal.exe -j4
### __Windows 平台 (Vistual Studio)__

项目提供了 [__CMakeLists.txt__](../CMakeLists.txt) 用于在`Visual Studio`中创建项目。
### __Linux / macOS / Unix 平台__


> make -j
你也可以通过如下的其中一行命令来指定你想要使用的编译器:
> make nasal CXX=... -j
## __使用方法__

如果你是 `Windows` 用户且想正常输出unicode,在nasal代码里写这个来开启unicode代码页:
```javascript
if (os.platform()=="windows") {
system("chcp 65001");
}
```
## __与andy解释器的不同之处__

必须用 var 定义变量
这个解释器使用了更加严格的语法检查来保证你可以更轻松地debug。这是非常有必要的严格,否则debug会非常痛苦。
同样的,flightgear 内置的 nasal 解释器也采取了类似的措施,所以使用变量前务必用 `var` 先进行声明。
在Andy的解释器中:
```javascript
foreach(i; [0, 1, 2, 3])
print(i)
```
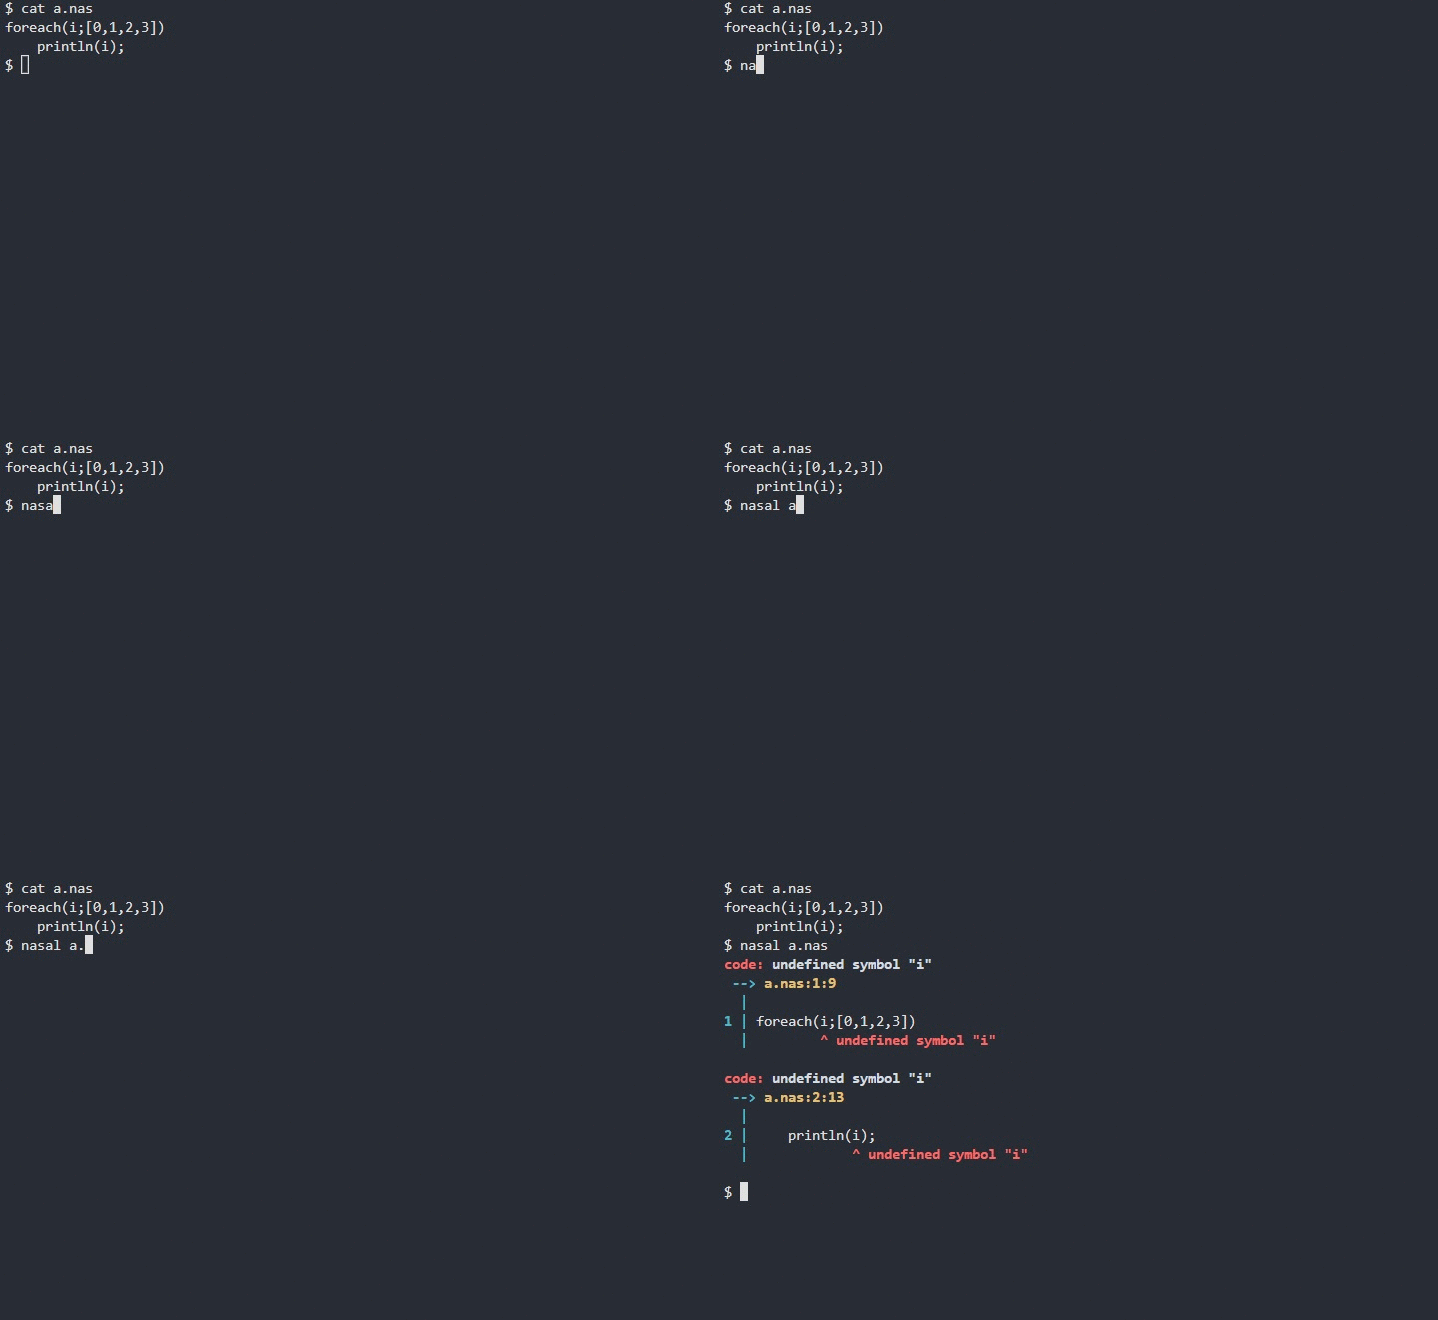
这个程序可以正常运行。然而这个`i`标识符实际上在这里是被第一次定义,而且没有使用`var`。我认为这样的设计很容易让使用者迷惑。他们可能都没有发现这里实际上是第一次定义`i`的地方。没有使用`var`的定义会让程序员认为这个`i`也许是在别的地方定义的。
所以在这个解释器中,我直接使用严格的语法检查方法来强行要求用户必须要使用`var`来定义新的变量或者迭代器。如果你忘了加这个关键字,那么你就会得到这个:
```javascript
code: undefined symbol "i"
--> test.nas:1:9
|
1 | foreach(i; [0, 1, 2, 3])
| ^ undefined symbol "i"
code: undefined symbol "i"
--> test.nas:2:11
|
2 | print(i)
| ^ undefined symbol "i"
```
内置函数 die
`die`函数用于直接抛出错误并终止执行。
```javascript
func() {
println("hello");
die("error occurred this line");
return;
}();
```
```javascript
hello
[vm] error: error occurred this line
[vm] error: error occurred in native function
call trace (main)
call func@0x557513935710() {entry: 0x850}
trace back (main)
0x000547 4c 00 00 16 callb 0x16 <__die@0x557512441780>(std/lib.nas:150)
0x000856 4a 00 00 01 callfv 0x1(a.nas:3)
0x00085a 4a 00 00 00 callfv 0x0(a.nas:5)
stack (0x5575138e8c40, limit 10, total 14)
0x00000d | null |
0x00000c | pc | 0x856
0x00000b | addr | 0x5575138e8c50
0x00000a | nil |
0x000009 | nil |
0x000008 | str | <0x5575138d9190> error occurred t...
0x000007 | nil |
0x000006 | func | <0x5575139356f0> entry:0x850
0x000005 | pc | 0x85a
0x000004 | addr | 0x0
```
栈溢出
这是一个会导致栈溢出的例子:
```javascript
func(f) {
return f(f);
}(
func(f) {
f(f);
}
)();
```
```javascript
[vm] error: stack overflow
call trace (main)
call func@0x564106058620(f) {entry: 0x859}
--> 583 same call(s)
call func@0x5641060586c0(f) {entry: 0x851}
trace back (main)
0x000859 45 00 00 01 calll 0x1(a.nas:5)
0x00085b 4a 00 00 01 callfv 0x1(a.nas:5)
0x00085b 582 same call(s)
0x000853 4a 00 00 01 callfv 0x1(a.nas:2)
0x00085f 4a 00 00 01 callfv 0x1(a.nas:3)
stack (0x56410600be00, limit 10, total 4096)
0x000fff | func | <0x564106058600> entry:0x859
0x000ffe | pc | 0x85b
0x000ffd | addr | 0x56410601bd20
0x000ffc | nil |
0x000ffb | nil |
0x000ffa | func | <0x564106058600> entry:0x859
0x000ff9 | nil |
0x000ff8 | func | <0x564106058600> entry:0x859
0x000ff7 | pc | 0x85b
0x000ff6 | addr | 0x56410601bcb0
```
运行时错误
如果在执行的时候出现错误,程序会直接终止执行:
```javascript
func() {
return 0;
}()[1];
```
```javascript
[vm] error: must call a vector/hash/string but get number
trace back (main)
0x000854 47 00 00 00 callv 0x0(a.nas:3)
stack (0x564993f462b0, limit 10, total 1)
0x000000 | num | 0
```
详细的崩溃信息
使用命令 __`-d`__ 或 __`--detail`__ 后,trace back信息会包含更多的细节内容:
```javascript
hello
[vm] error: error occurred this line
[vm] error: error occurred in native function
call trace (main)
call func@0x55dcb5b8fbf0() {entry: 0x850}
trace back (main)
0x000547 4c 00 00 16 callb 0x16 <__die@0x55dcb3c41780>(std/lib.nas:150)
0x000856 4a 00 00 01 callfv 0x1(a.nas:3)
0x00085a 4a 00 00 00 callfv 0x0(a.nas:5)
stack (0x55dcb5b43120, limit 10, total 14)
0x00000d | null |
0x00000c | pc | 0x856
0x00000b | addr | 0x55dcb5b43130
0x00000a | nil |
0x000009 | nil |
0x000008 | str | <0x55dcb5b33670> error occurred t...
0x000007 | nil |
0x000006 | func | <0x55dcb5b8fbd0> entry:0x850
0x000005 | pc | 0x85a
0x000004 | addr | 0x0
registers (main)
[pc ] | pc | 0x547
[global] | addr | 0x55dcb5b53130
[local ] | addr | 0x55dcb5b43190
[memr ] | addr | 0x0
[canary] | addr | 0x55dcb5b53110
[top ] | addr | 0x55dcb5b431f0
[funcr ] | func | <0x55dcb5b65620> entry:0x547
[upval ] | nil |
global (0x55dcb5b53130)
0x000000 | nmspc| <0x55dcb5b33780> namespace [95 val]
0x000001 | vec | <0x55dcb5b64c20> [0 val]
...
0x00005e | func | <0x55dcb5b8fc70> entry:0x846
local (0x55dcb5b43190 <+7>)
0x000000 | nil |
0x000001 | str | <0x55dcb5b33670> error occurred t...
0x000002 | nil |
```
展开
```javascript
source code:
--> var fib=func(x)
{
if(x<2) return x;
return fib(x-1)+fib(x-2);
}
for(var i=0;i<31;i+=1)
print(fib(i),'\n');
next bytecode:
0x000848 4a 00 00 01 callfv 0x1(std/lib.nas:427)
0x000849 3d 00 00 00 pop 0x0(std/lib.nas:427)
0x00084a 07 00 00 00 pnil 0x0(std/lib.nas:423)
0x00084b 56 00 00 00 ret 0x0(std/lib.nas:423)
0x00084c 03 00 00 5e loadg 0x5e(std/lib.nas:423)
--> 0x00084d 0b 00 08 51 newf 0x851(test/fib.nas:1)
0x00084e 02 00 00 03 intl 0x3(test/fib.nas:1)
0x00084f 0d 00 00 08 para 0x8 (x)(test/fib.nas:1)
stack (0x55ccd0a1b9d0, limit 10, total 0)
>>
```
展开
```javascript
source code:
var fib=func(x)
{
--> if(x<2) return x;
return fib(x-1)+fib(x-2);
}
for(var i=0;i<31;i+=1)
print(fib(i),'\n');
next bytecode:
0x000850 3e 00 08 60 jmp 0x860(test/fib.nas:1)
--> 0x000851 45 00 00 01 calll 0x1(test/fib.nas:3)
0x000852 39 00 00 07 lessc 0x7 (2)(test/fib.nas:3)
0x000853 40 00 08 56 jf 0x856(test/fib.nas:3)
0x000854 45 00 00 01 calll 0x1(test/fib.nas:3)
0x000855 56 00 00 00 ret 0x0(test/fib.nas:3)
0x000856 44 00 00 5f callg 0x5f(test/fib.nas:4)
0x000857 45 00 00 01 calll 0x1(test/fib.nas:4)
stack (0x55ccd0a1b9d0, limit 10, total 8)
0x000007 | pc | 0x869
0x000006 | addr | 0x0
0x000005 | nil |
0x000004 | nil |
0x000003 | num | 0
0x000002 | nil |
0x000001 | nil |
0x000000 | func | <0x55ccd0a58fa0> entry:0x487
>>
```